Foot selection –
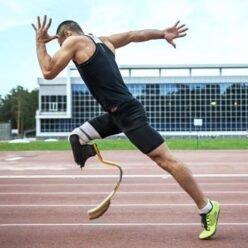
There is a variety of prosthetic feet to choose from, and they come in several configurations. Either a one-piece foot that attaches directly to the bottom of the socket (see picture below), or a foot that attaches to a pylon (a cylinder-shaped rod) which is then attached to the bottom of the socket. In my opinion, BK-Short should never use a pylon. Instead, always use the one-piece foot that attaches directly into the socket. In particular, the best two options on the market in this category are Silhouette by Ottobock, and Flex-Foot (Vari-Flex Modular) by Osscur or similar (see pictures below). These are two variations of the same one-piece style foot that are available and best suited for BK-Short. I have one of each and am very happy with them both.
Here is my argument for the one-piece foot, which is based on years of experience using this type of foot. First, keeping the prosthesis weight low is very beneficial for BK-Short, because when your residual is short, and the prosthesis is heavy, it will come off with knee bending and leg movement and maneuvering. My entire prosthesis weighs 2.2 pounds, and 3.7 pounds when adding the foot shell and shoes, see (see pictures below). Second, the long flexing rod on these feet turns the disadvantages of BK-Short into advantages, because shorter residuals mean longer carbon fiber rod. This means more energy stored as the foot and the carbon fiber rod flexes when you step in, and more energy returned as you step off. Third, the one-piece carbon fiber rod that extends from the bottom of the socket to the tip of the toes, bows and flexes seamlessly and harmoniously to provide a springy and cushiony action, which is needed as BK-Short presses more pounds per square inch of short residual. Fourth, this style of foot can get wet repeatedly without damage, so you can use it for showers, beach activities, etc.


Foot action level –
Flex-Foot and Silhouette are custom-ordered, and during the ordering process, your prosthetist must select your weight and activity level. This will be reflected in the thickness of the carbon fiber rod that is custom-made for you and will determine the softness or hardness that you will experience with each step. So, when it comes to selecting the grade and activity level, make sure that you ask your prosthetist to select a lower grade or activity level than your weight and activity level call for. This is important because these feet were designed and tested for average-size residuals, which are longer than yours and tolerate more leverage and pressure. However, in the world of BK-Short, our short residuals cannot apply or tolerate the extra pressure. Why? Because we walk differently, as in dance-walk, a concept that will be explained later. This all may sound strange to anyone who is not a BK-Short or who has not worked with a BK-Short.
Alignment –
Once the prosthesis is assembled, alignment comes next. Alignment can make the difference between a terrible and awesome walk. While alignment is not a complicated process, it has some tricks. So, take your time and explain to your prosthetist what you feel and what you want to feel in your walk, in detail. Also, take the prosthesis home after each alignment session, try it for a few days, then rinse and repeat, until you are satisfied. You will be surprised by the difference between environments, like walking on grass vs concrete, etc. Do not rush the alignment. Once you are happy with the alignment, the alignment mechanism will be locked tight before you take the final delivery.
When it comes to alignment of the Flex-Foot and Silhouette, I like the Tube Clamp mechanism by Ottobock best, see Figure-6 and Figure-9. They are simple but offer more possibilities. They provide adjustments for toe in and toe out, which allows your foot to point straight, and adjustment to keep your leg rolling straight, instead of tipping forward right or forward left. They also provide adjustment for adduction and abduction, which means as you take a step, the prosthesis can kick inward or sideward. Alignment can also adjust the softness of the heel as you step in, so that the heel is not too firm and harsh, or too soft like diving in. Foot roll resistance is another important adjustment, where rolling from heel to toes can be adjusted from hard resistance forward roll to no resistance, like falling forward. Please note that I have been told by several prosthetists during my alignment that the tiniest adjustment makes a big difference for me, micro-adjustments, so take your time with alignments and adjust in small increments. Anyways, there will be a point where you will know that you have reached all optimum adjustments, after going back and forth in each. So, don’t rush alignment and take your time until you feel done and satisfied.
Note – Make sure to take your favorite shoes with you during prosthesis assembly and alignment, for the alignment is done based on the given prosthesis and shoe combination. Shoe selection is important and will be covered in a separate section later. Also, make sure that your prosthetist checks and verifies that your prosthesis has the right height, and your hips are leveled. Proper height and leveled hips are important to minimize hip rotation and pelvic floor issues, and this will also be covered later.
Foot shell –
When it comes to a foot shell, there is only one choice for either Silhouette or Flex-Foot, but here we cover the foot shell in a separate section for two reasons. First, there is a special friction sock that covers the foot when inside the shell. This sock has an important job protecting the foot and shell from grinding one another with each step. It also keeps the foot from making noise with each step, which can be annoying. The key is, when your step becomes noisy, check and replace this sock. Second, if you are planning to get your prosthesis wet, say shower, beach, jet ski, etc., that’s okay. Just make sure that you drill 4-6 quarter-inch holes at the bottom corners of the foot shell (see pictures below). This will allow the water to drain. Also, make sure to use a gel sleeve to cover the liner, and use aqua shoes. This will be covered later in a separate section.

